Hair Trends
21 Stunning Concert Hairstyles to Rock Your Next Gig
A concert hairstyle needs to survive three things: heat from the crowd, movement from dancing, and the photographic evidence that someone will post at 1 AM. The styles here are built for all three — they hold up under pressure, look better as the night goes on, and won't leave you tugging at pins during the opening act.
Whether you're front row at an arena show or spread out on a blanket at an outdoor festival, the right hairstyle becomes part of the outfit. We covered everything from braids that won't budge to loose waves that improve with sweat. Pick the one that matches your venue, your genre, and how much time you actually want to spend getting ready.
1.Glamorous Voluminous Half-Up with Butterfly Clip
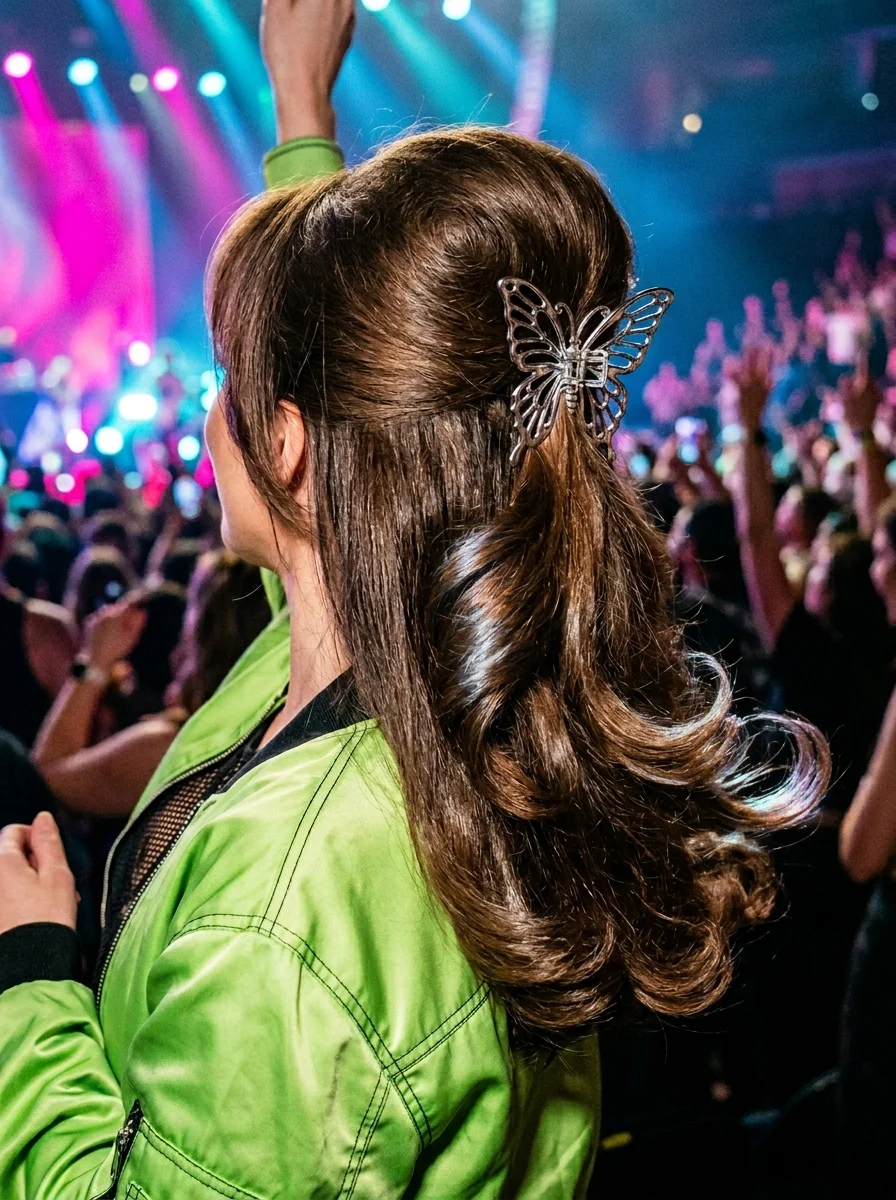
The overview: Short to long hair with subtle balayage highlights. Top section gathered at the crown and secured with an oversized silver butterfly claw clip. Remaining hair in loose, voluminous waves. Face-framing pieces left out at the temples.
Why this look is popular: The half-up style is universally flattering — it lifts the face while maintaining length. The oversized butterfly clip is a statement accessory that does the styling work for you. The balayage color adds dimension that photographs beautifully under concert lighting.
Where this look is suitable: Pop concerts, arena shows, and any venue where you want polished energy without fighting your hair all night.
Step by step:
- Curl for volume. Use a 1.25-inch curling iron on 1-inch sections, wrapping away from the face. Leave ends out for a modern finish.
- Backcomb the crown. Tease the roots at the crown slightly for lift before gathering.
- Gather the top section. Collect hair from the temples to the crown and pull it back.
- Secure with the butterfly clip. Position the oversized silver butterfly claw clip at the back of the crown. Ensure it grips firmly.
- Pull out face-framing pieces. Tug a few soft strands around your temples for framing.
Tips and tricks: A light-hold hairspray before curling helps the waves last through a full set. The butterfly clip should be heavy-duty enough to grip your hair thickness — cheap clips slip by the second song.
28 Effortless Hot Weather Day Hairstyles for Women 2026 ☀️💇♀️
2.Effortless Half-Up Twist with Statement Clip
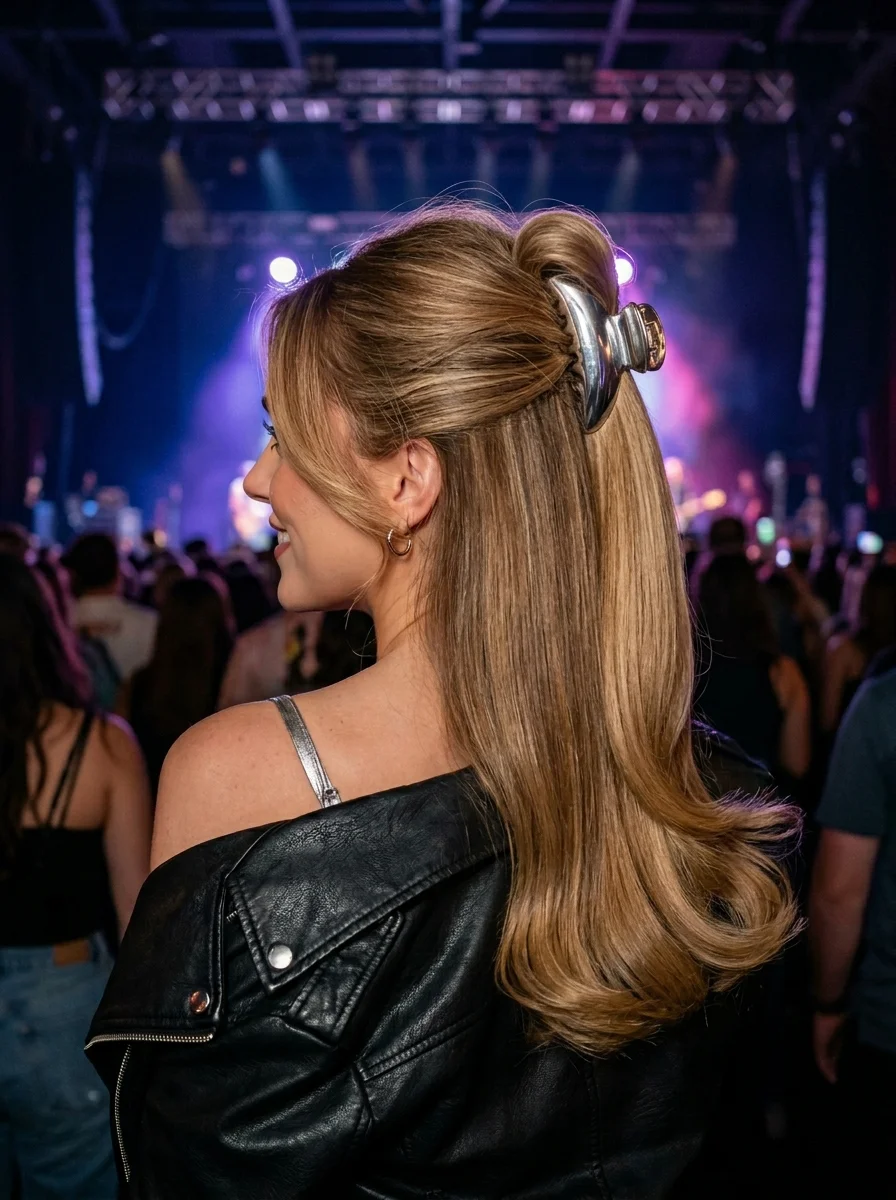
The overview: Short to long hair with curtain bangs, twist secured with a chrome oval claw clip. This is the indie rock front-row look — it looks thrown together but the chrome clip signals intention. Curtain bangs frame the face while the twist keeps things practical.
Why this look is popular: The chrome claw clip is having a moment — it's minimalist but catches light in a way that reads expensive. Curtain bangs are low-maintenance face-framing that work on most face shapes. The twist is faster than a braid but looks more polished than a basic half-up.
Where this look is suitable: Indie rock shows, small venue concerts, and any setting where the vibe leans cool-girl effortless.
Step by step:
- Style the curtain bangs. Use a round brush to sweep the bangs outward and to the sides while blow-drying.
- Add texture. Apply sea salt spray or texturizing mousse to damp hair and air-dry or diffuse.
- Twist the top section. Gather from the temples and twist loosely toward the back of the head.
- Clip it. Secure the twist with the chrome oval claw clip. Let the tail of the twist fan out slightly above the clip.
Tips and tricks: The twist should be loose enough to look effortless but tight enough to hold through the night. If your bangs won't cooperate, a small amount of dry shampoo at the roots gives them grip without weighing them down.
3.High Festival Ponytail with Chunky Braid
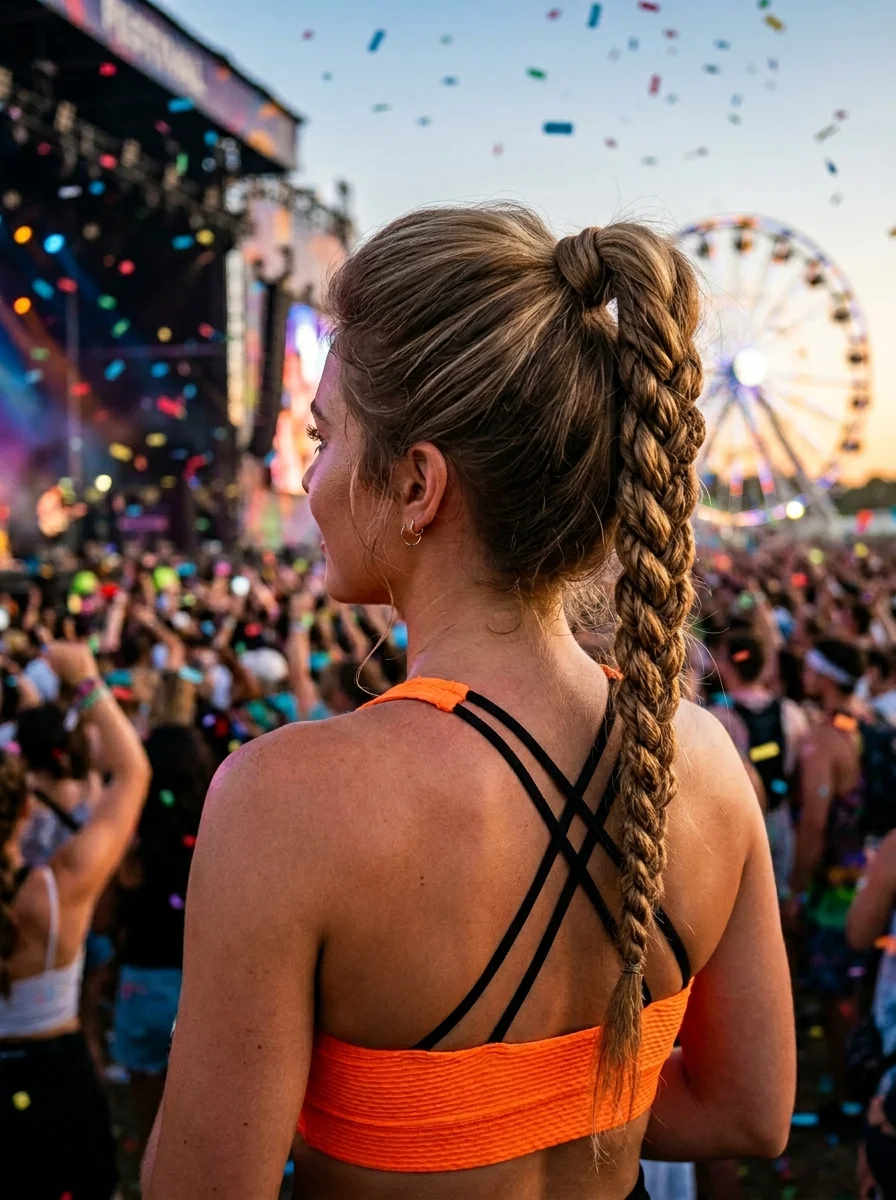
The overview: Medium to long hair pulled into a high ponytail with a pancaked chunky braid running through it. This is the outdoor festival workhorse — it keeps your hair off your neck, survives wind, and the pancaked braid adds visual interest without requiring accessories. The high placement creates a youthful, energetic silhouette.
Why this look is popular: The high ponytail is practical for all-day wear — it keeps hair off your neck in heat and stays secure during movement. The pancaked braid transforms a basic ponytail into something that looks styled. It works on medium to long hair and takes under 10 minutes.
Where this look is suitable: Outdoor festivals, daytime concerts, and any setting where you'll be moving, sweating, and still wanting to look intentional.
Step by step:
- Gather high. Pull all hair into a high ponytail at the crown. Secure with a strong elastic that won't snap.
- Section the braid. Take a thick section from the center of the ponytail and divide it into three strands.
- Braid loosely. Create a standard three-strand braid, keeping it intentionally loose.
- Pancake the braid. Gently pull the outer loops to widen the braid significantly. The wider, the better.
- Secure the braid end. Tie off with a clear elastic and let it blend into the rest of the ponytail.
Tips and tricks: Texturizing spray before braiding gives the hair grip so the pancaked shape holds. For finer hair, backcomb the ponytail base before braiding for extra volume. A strong-hold hairspray on the finished braid prevents flyaways without stiffness.
30 Stunning July Nail Designs for Summer 2026 💅
4.Enchanted Forest Braid Crown
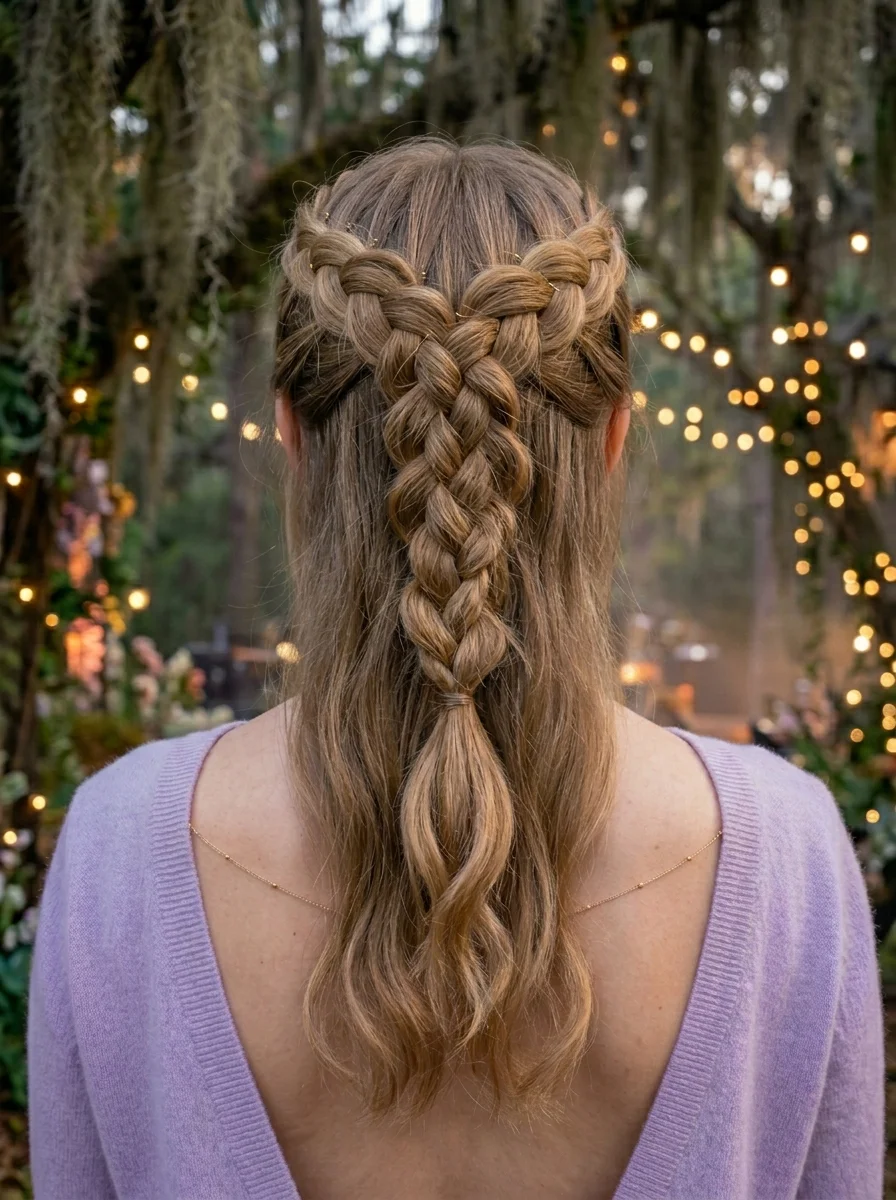
The overview: Long hair styled into Dutch braids that merge into a cascading braid crown. This is the folk and indie festival dream — it's romantic, practical, and photographs like a Renaissance painting. The braided crown keeps every strand in place while the cascading tail adds movement and drama.
Why this look is popular: Dutch braids create a raised, three-dimensional texture that reads as more intricate than French braids. The crown construction is essentially indestructible once secured. The ash blonde tone gives it an ethereal, otherworldly quality that matches folk and indie aesthetics.
Where this look is suitable: Folk festivals, indie outdoor concerts, garden parties, and any setting where the vibe leans whimsical and romantic.
Step by step:
- Create a center part. Use a rat-tail comb for a clean, precise part from forehead to nape.
- Dutch braid each side. Start at the hairline, cross strands under to create the raised effect, and braid along the crown toward the back.
- Meet at the back. Secure both braids where they converge at the back of the head with a clear elastic.
- Braid the remaining length. Combine the braid tails with any loose hair and create a single three-strand braid down the back.
- Pancake everything. Gently pull the outer loops of all braids to widen them for a fuller, more romantic effect.
Tips and tricks: Keep the braids tight at the scalp for clean lines, then pancake after securing. Ash blonde toner is essential for achieving the ethereal tone — brassiness kills the enchanted forest effect. A flexible-hold hairspray keeps everything in place without crunch.
5.Edgy Chain-Accent French Braid
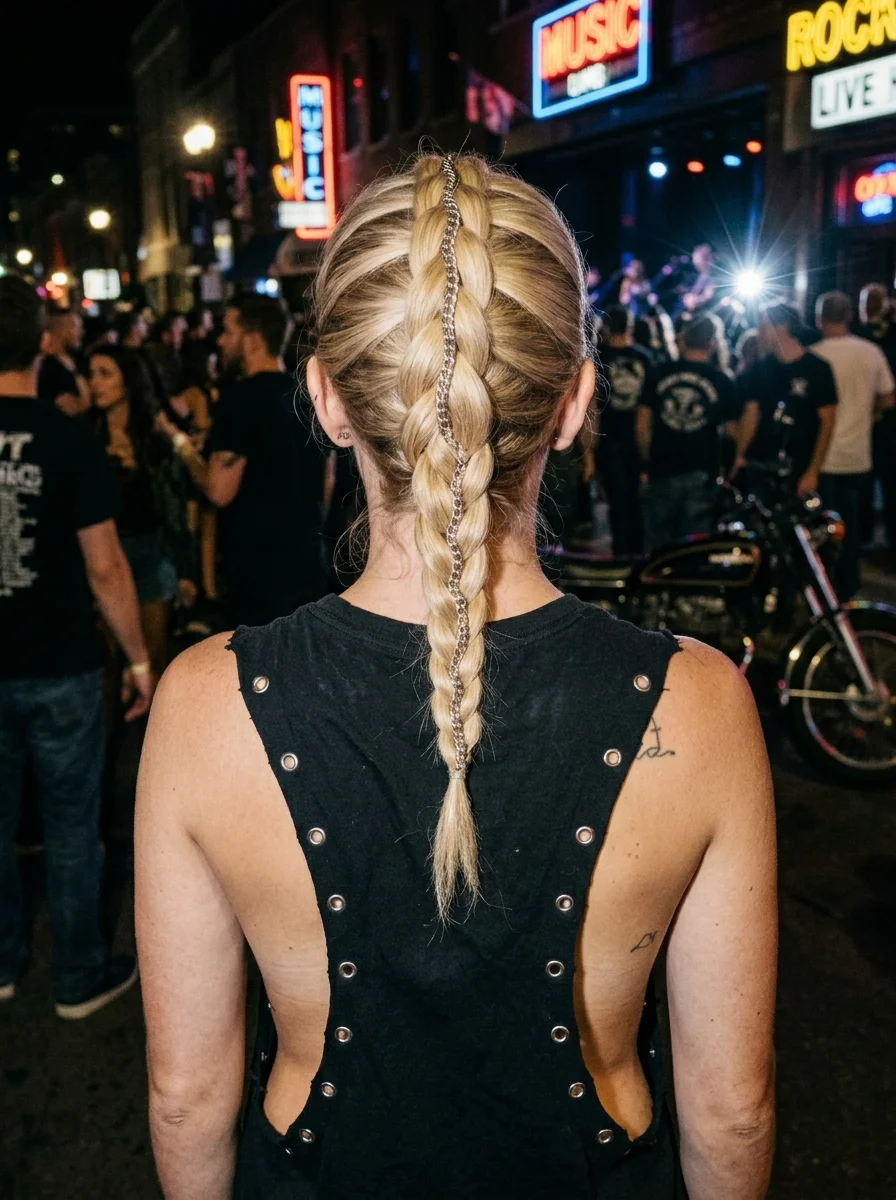
The overview: Medium to long hair with a center Dutch braid and a silver chain woven through it. This is the rock club essential — it's edgy without being high-maintenance, and the chain catches every flash and spotlight in the room. The center braid keeps hair tight against the scalp, which means zero interference when you're in the pit.
Why this look is popular: The silver chain woven through the braid is a detail that separates this from any basic braid. It catches light dramatically in dark venues. The Dutch braid technique raises the braid off the scalp for maximum visibility, and the platinum color makes the chain pop even harder.
Where this look is suitable: Rock clubs, punk shows, metal concerts, and any venue where the lighting is dramatic and the energy is intense.
Step by step:
- Part precisely. Create a razor-sharp center part from forehead to nape.
- Dutch braid. Start at the hairline and braid straight back, crossing strands under. Keep it tight to the scalp.
- Weave in the chain. As you braid, lay the silver chain along the braid path and incorporate it like a fourth strand. Alternatively, thread it through after braiding.
- Secure the end. Tie off at the nape with a clear elastic. Let the chain tails dangle from the braid end.
- Slick the sides. Use a small amount of gel or pomade on the sides to keep everything tight and polished.
Tips and tricks: Use a lightweight chain — heavy chain pulls the braid down and creates discomfort. Jewelry-making chain from a craft store works perfectly and costs a fraction of hair-specific versions. Cut the chain longer than you think you need; you can always trim the tails.
29 Fun FIFA World Cup Watch Party Hairstyles (2026)
6.The Messy Rocker Mullet
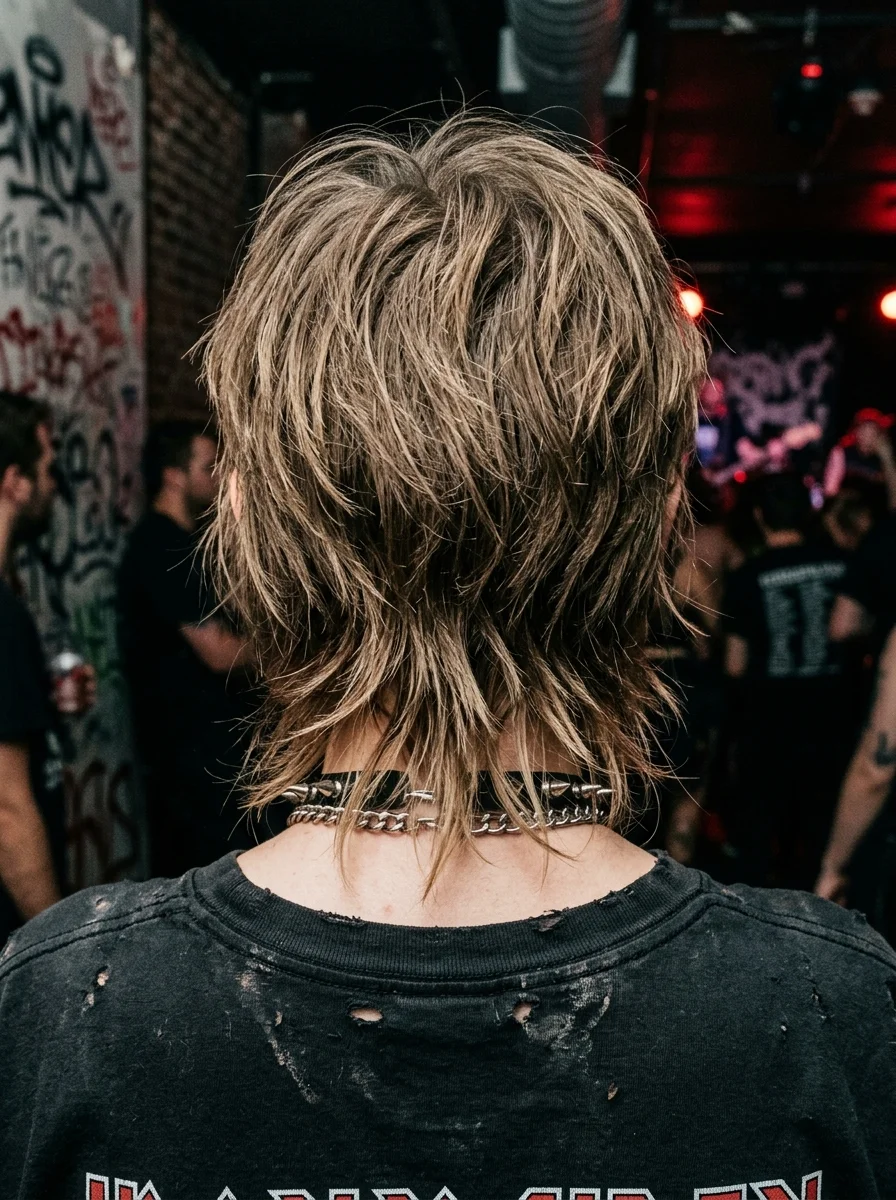
The overview: Short hair, textured into a modern mullet. This is the punk and rock show haircut — short and choppy on top, longer at the nape, and deliberately messy throughout. The mullet revival is real, and this version is executed with razor-sharp layers that create natural volume and movement without any styling effort.
Why this look is popular: The modern mullet is the ultimate wash-and-wear cut. The built-in texture means you can air-dry and go. The dark root with ashy highlights adds dimension without maintenance. It gets better as it gets messier, which makes it ideal for multi-hour shows.
Where this look is suitable: Punk shows, rock concerts, underground venues, and any setting where the aesthetic leans rebellious and raw.
Step by step:
- Apply texturizing product. Work sea salt spray or matte pomade through damp hair.
- Rough-dry. Use your fingers, not a brush, to rough-dry the hair. A diffuser on low heat works too.
- Add root lift. Flip your head upside down and shake the roots with your fingers for volume.
- Shape the layers. Use your fingers to piece out the layers and create definition. Don't brush — the messiness is the design.
Tips and tricks: Ask your stylist for a "modern mullet with razor-cut layers" — the razor technique creates piecey texture that scissors can't replicate. Skip conditioner on show days for maximum grit and texture.
7.Effortless Chic Claw Clip Updo
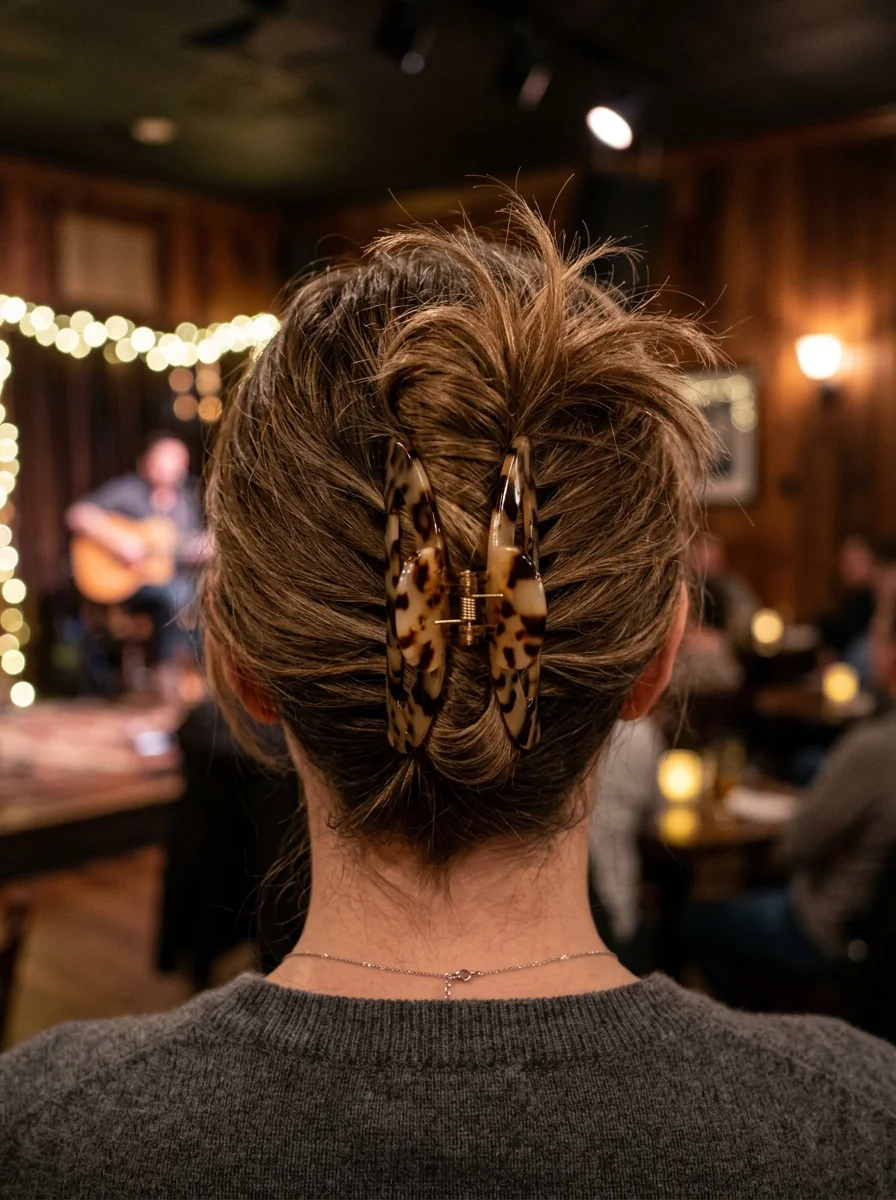
The overview: Medium to long hair twisted into a messy updo and secured with a tortoiseshell claw clip. This is the acoustic show look — understated, warm, and perfectly matched to the intimate energy of a small venue. The claw clip holds everything in place while the messy texture keeps it from looking overdone.
Why this look is popular: The claw clip is the most practical updo accessory — it holds more hair than bobby pins and takes three seconds to use. The tortoiseshell pattern adds warmth that complements brown and caramel tones. The messy texture is forgiving and improves throughout the night.
Where this look is suitable: Acoustic shows, coffeehouse concerts, small venue performances, and any setting where the vibe is warm and intimate.
Step by step:
- Texturize. Apply dry shampoo or texturizing spray for grip and volume.
- Twist upward. Gather all hair and twist it upward from the nape toward the crown. Keep it loose — don't pull tight.
- Fold and clip. Fold the twist down against the back of your head and secure with the claw clip. Let pieces fall naturally around the clip.
- Pull out face-framing pieces. Tug soft strands around your face and ears for a relaxed frame.
Tips and tricks: The claw clip should be large enough to grip all your hair — if it slips, your hair is too heavy for that clip size. Second- day hair holds this style better than freshly washed hair. The balayage tones add visual interest that a solid color can't match.
30 Trendy Summer French Tip Nail Designs for 2026 💅
8.Sleek Low Twisted Chignon
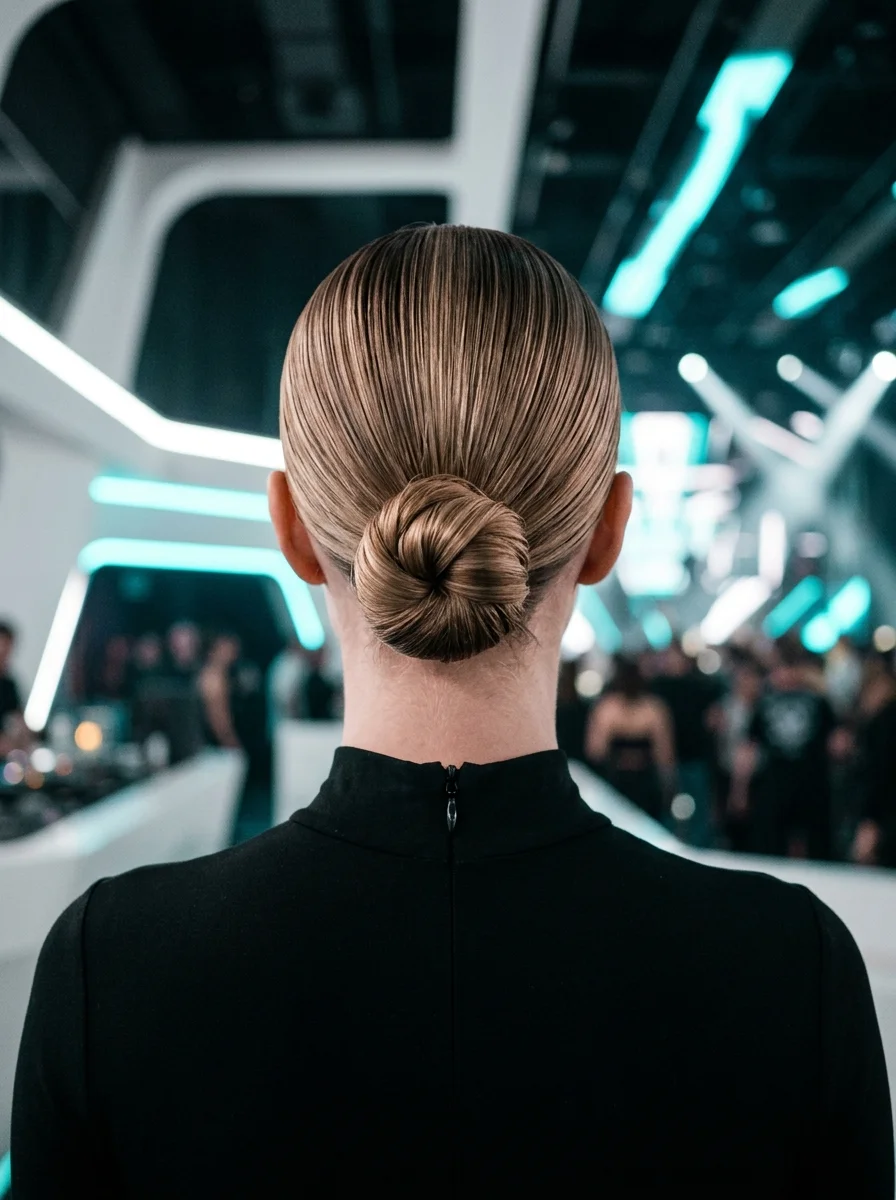
The overview: Medium to long hair smoothed into an ultra-sleek center-parted chignon at the nape. Every strand is in place, every line is deliberate. This is the EDM and avant-garde look — it reads as high-fashion editorial, and it holds up perfectly through hours of movement because there's nothing loose to fall apart.
Why this look is popular: The extreme sleekness communicates control and precision. The low chignon is universally flattering and comfortable for extended wear. The ash blonde and platinum tones look striking against a sleek silhouette, catching venue lighting in a way that loose styles can't.
Where this look is suitable: EDM events, avant-garde concerts, high-fashion festivals, and any venue where the aesthetic leans editorial and polished.
Step by step:
- Apply strong-hold product. Work gel or high-shine pomade from roots to ends for maximum sleekness.
- Create the center part. Use a fine-tooth comb for a razor-precise part from forehead to nape.
- Brush smooth. Use a boar bristle brush to pull everything flat toward the nape. Eliminate every bump.
- Form the chignon. Gather into a low ponytail, twist tightly, and coil into a compact bun at the nape. Pin with color-matched bobby pins inserted diagonally.
- Refine the surface. Go back over the crown and sides with more product and a fine-tooth comb for glass-like smoothness.
Tips and tricks: A boar bristle brush is essential for achieving the sleek finish. Second-day hair works better because natural oils help the product adhere. If the chignon feels loose, anchor it with crossed bobby pins at the base.
9.The Perfect Curly Bob for Concert Nights
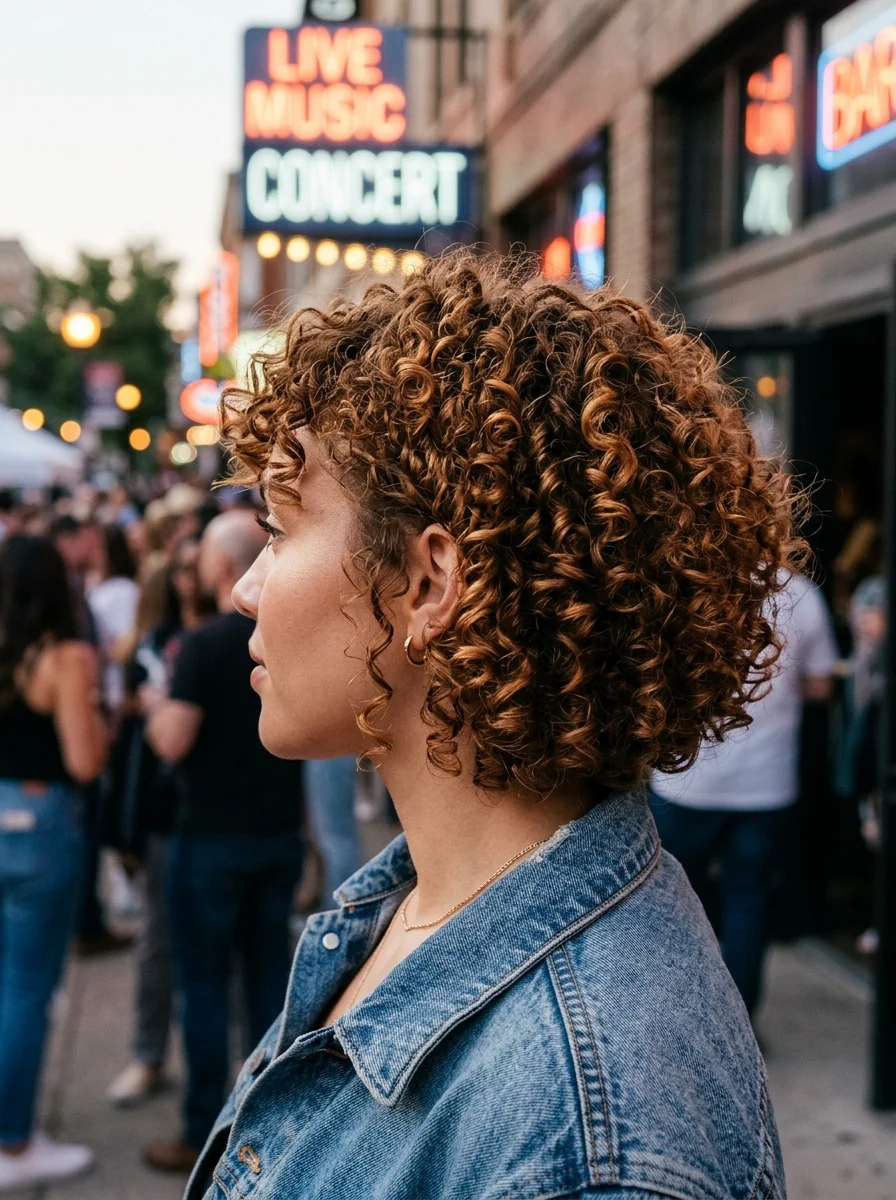
The overview: Short hair with natural 3A-3B curls worn in a chin-length bob. This is the jazz and soul look — it's warm, textured, and full of natural movement. The bob length keeps things manageable while the curl pattern provides built-in volume and personality that straight- haired people spend forty minutes trying to replicate.
Why this look is popular: The curly bob embraces natural texture rather than fighting it. The copper and auburn tones are warm and eye-catching under venue lighting. The chin-length cut is low-maintenance and improves as the night goes on — curls gain volume and character with humidity and movement.
Where this look is suitable: Jazz clubs, soul concerts, intimate venue shows, and any setting where warm, sophisticated energy is the goal.
Step by step:
- Wash with curl-friendly products. Use sulfate-free shampoo and a moisturizing conditioner designed for curly hair.
- Apply curl cream. On soaking wet hair, scrunch a curl-defining cream from roots to ends using the praying hands method.
- Scrunch and shape. Flip your head upside down and scrunch upward to encourage curl formation. Shake the roots for volume.
- Air-dry or diffuse. Let curls air-dry naturally or use a diffuser on low heat. Don't touch them while they dry.
- Break the cast. Once completely dry, scrunch out any product cast with a few drops of lightweight oil.
Tips and tricks: A satin or silk pillowcase the night before prevents frizz and preserves curl definition. A microfiber towel absorbs excess water without creating frizz. For humidity-heavy venues, a gel over the curl cream creates a stronger hold that lasts longer.
28 Stunning Baddie Summer Hairstyles for 2026 🔥☀️
10.Electric Dual-Tone Warrior Braids
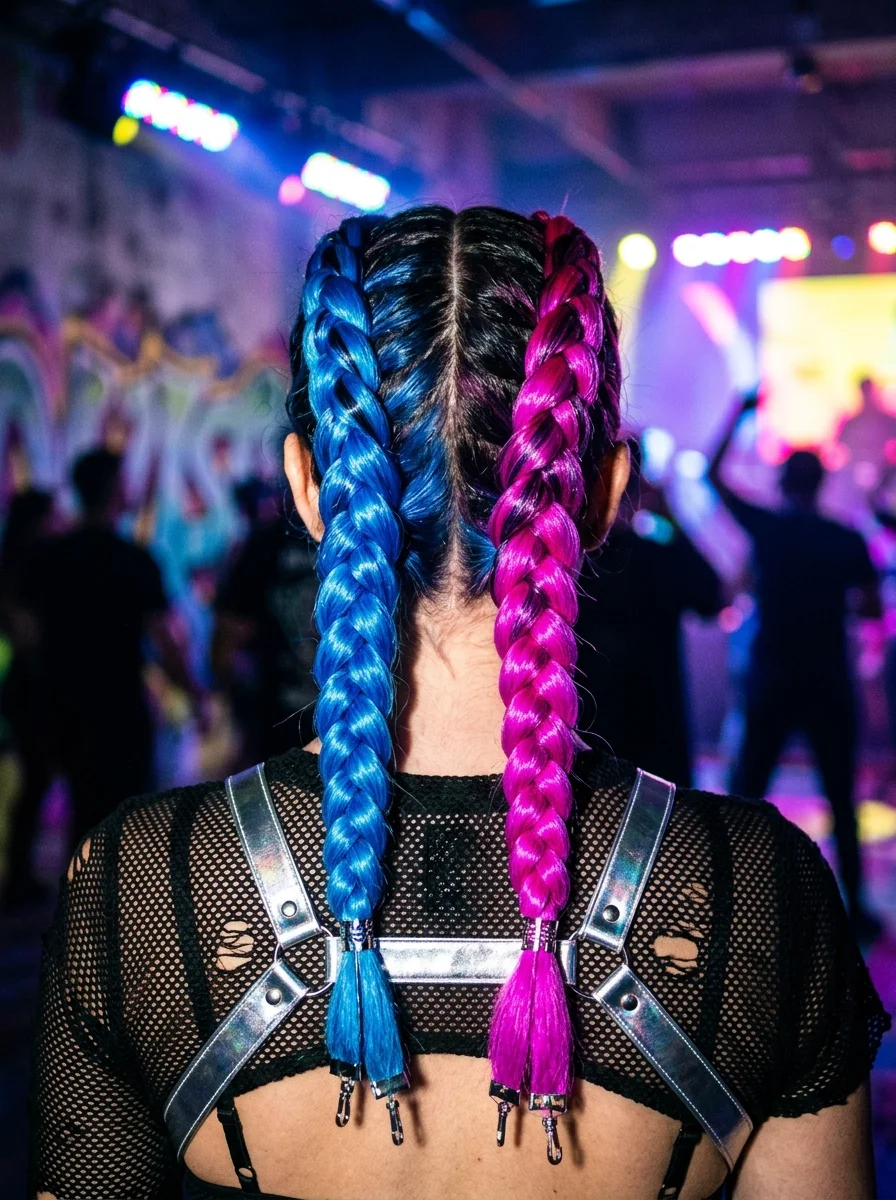
The overview: Medium to long hair with electric blue and hot magenta extensions woven into Dutch braids. This is the EDM and rave uniform — it's bold, high-visibility, and impossible to ignore. The dual-tone extensions create a color-block effect that photographs like a neon sign, and the Dutch braids keep everything secure through hours of dancing.
Why this look is popular: The electric blue and hot magenta combination is visually explosive — it catches every blacklight and LED in the venue. Dutch braids provide a raised, 3D texture that shows off the color contrast. Extensions mean you get the color impact without commitment.
Where this look is suitable: EDM festivals, raves, warehouse parties, and any venue where the lighting is dramatic and the energy is maximum.
Step by step:
- Clip in extensions. Secure the blue and magenta clip- in extensions at the root, hidden beneath the top layer of hair.
- Part down the center. Create a clean center part from forehead to nape.
- Dutch braid each side. Incorporate the extensions into the braids as you go, crossing strands under for the raised effect.
- Secure tightly. Tie off each braid at the nape with strong elastics that won't snap during movement.
- Pancake for visibility. Gently pull the outer loops to widen the braids and maximize the color display.
Tips and tricks: Synthetic extensions are fine for this look — they're lighter and the colors are more vibrant. Clip them in close to the scalp to prevent shifting during dancing. A strong-hold hairspray along the braids prevents flyaways without killing the color vibrancy.
11.Chic Blunt Bob with Wispy Bangs
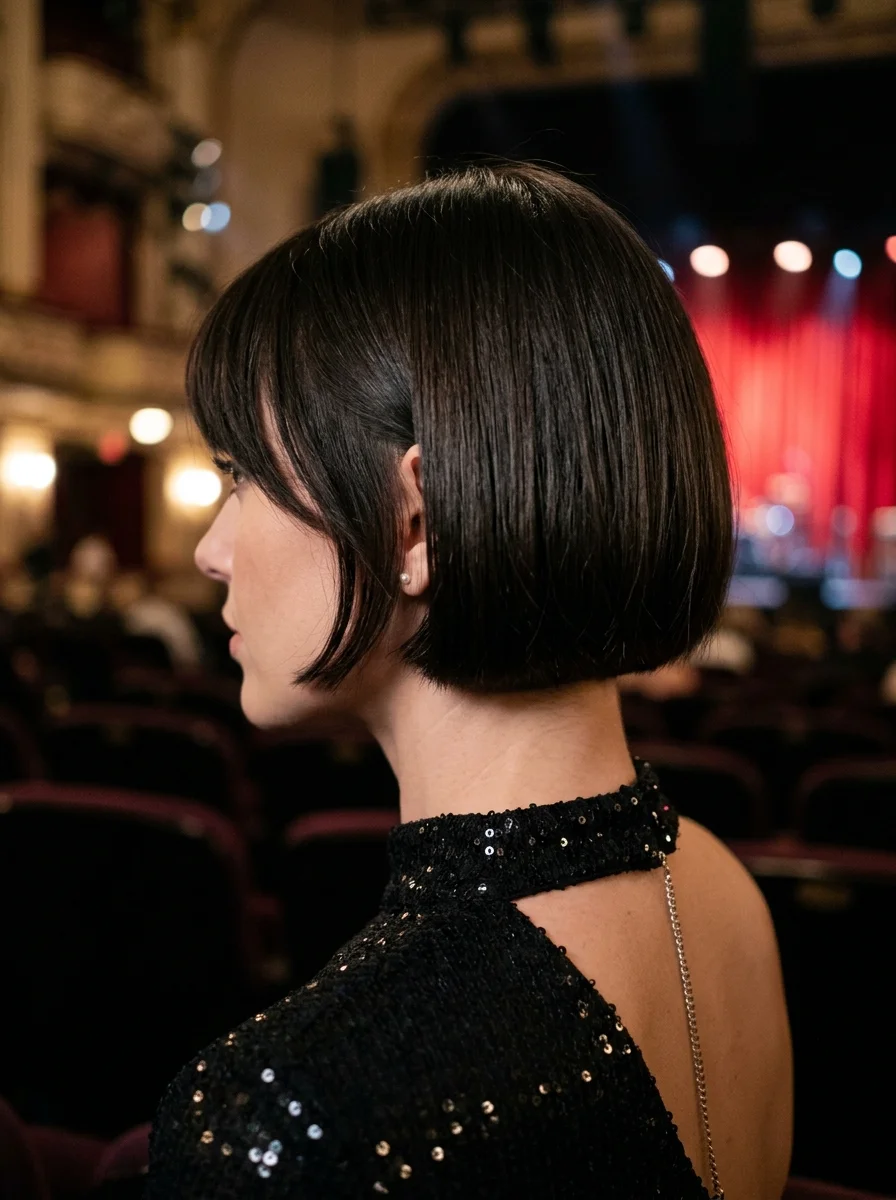
The overview: Short hair cut into a jaw-length blunt bob with wispy bangs. This is the theater and classical concert look — it's refined, precise, and signals taste. The blunt perimeter makes the hair appear thicker and healthier, while the wispy bangs add softness without committing to full fringe.
Why this look is popular: The blunt bob is the power cut of the moment — it's sharp, intentional, and photographs beautifully. The espresso brown color is rich and sophisticated. Wispy bangs soften the face while the clean perimeter line keeps the silhouette strong.
Where this look is suitable: Theater performances, classical concerts, opera, and any formal venue where polished sophistication is the goal.
Step by step:
- Smooth prep. Apply smoothing serum and heat protectant to damp hair.
- Blow-dry section by section. Use a round brush, pulling straight down for a sleek finish.
- Flat iron for glass hair. Work through small sections for mirror-like smoothness.
- Style the bangs. Use a round brush to blow-dry the wispy bangs forward and slightly to the side.
- Finish with shine. Light-hold or shine spray for the polished, high-gloss finish.
Tips and tricks: Regular trims every 4-6 weeks keep the blunt line sharp. A quality flat iron is the most important tool for this cut. The wispy bangs need regular maintenance to stay at the right length — too long and they lose their effect.
22 Office Nail Designs That Are Professional But Never Boring
12.Effortless Beachy Waves with a Chic Gold Barrette
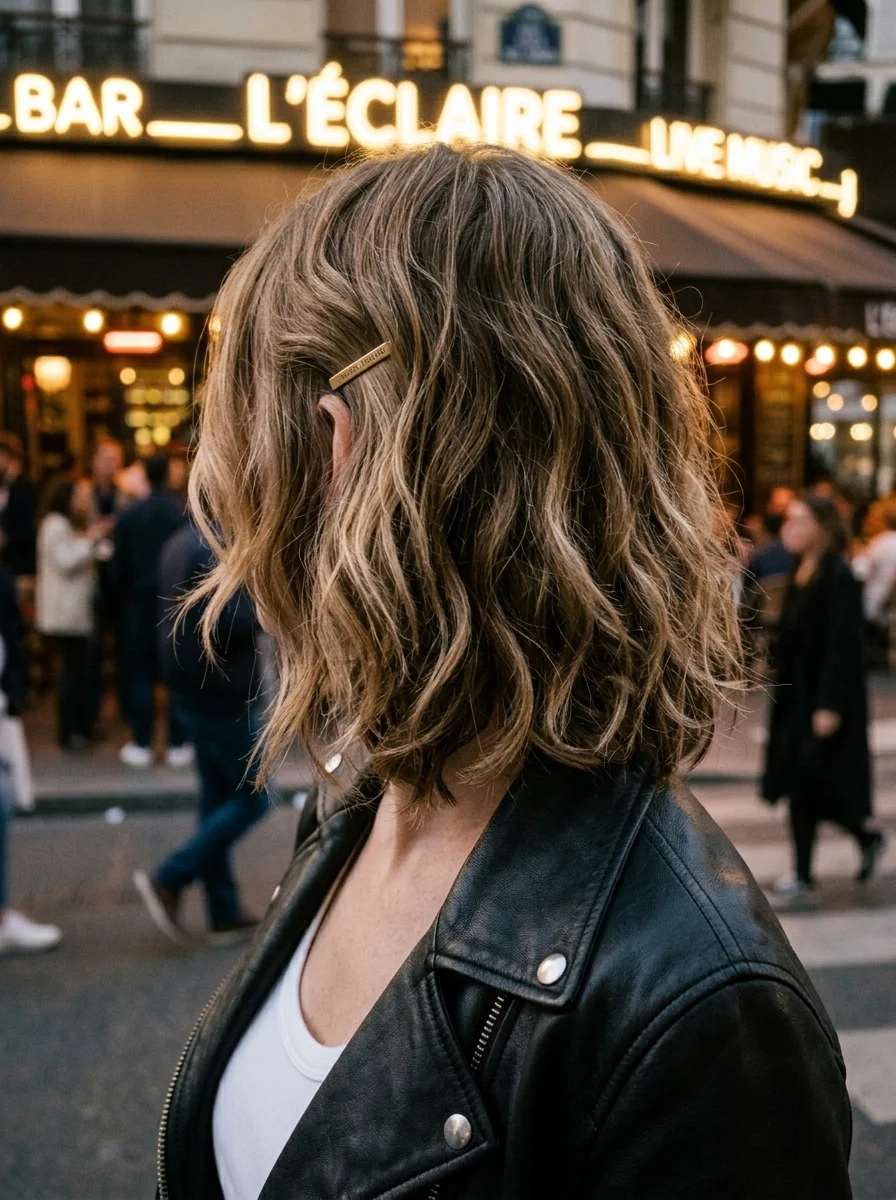
The overview: Small-length hair with tousled waves and a gold barrette pinning back one side. This is the bar and live music look — it's relaxed, warm, and perfectly suited to the low-key energy of a small venue. The gold barrette adds a jewelry-like accent that catches candlelight and stage glow without overdoing it.
Why this look is popular: Beachy waves are the most versatile concert hairstyle — they work on every hair type and improve with texture. The gold barrette is a minimal accessory that adds personality. The lob length is practical for all-night wear without getting in the way.
Where this look is suitable: Bar shows, live music venues, intimate concerts, and any setting where the vibe is casual and warm.
Step by step:
- Prep with texture. Apply sea salt spray or wave- enhancing mousse to damp hair.
- Curl with ends out. Use a large barrel iron, leaving the last inch straight for a modern finish.
- Finger-comb. Never brush these waves — run your fingers through to break them into soft, separated texture.
- Pin one side back. Take a section from the heavier side and secure it behind the ear with the gold barrette.
Tips and tricks: The waves should be curled away from your face on both sides to open up your features. For finer hair, flip your head upside down and scrunch with texturizing spray for instant volume. Gold hoops complement the barrette for a cohesive look.
13.Hollywood Waves with a Vintage Vibe
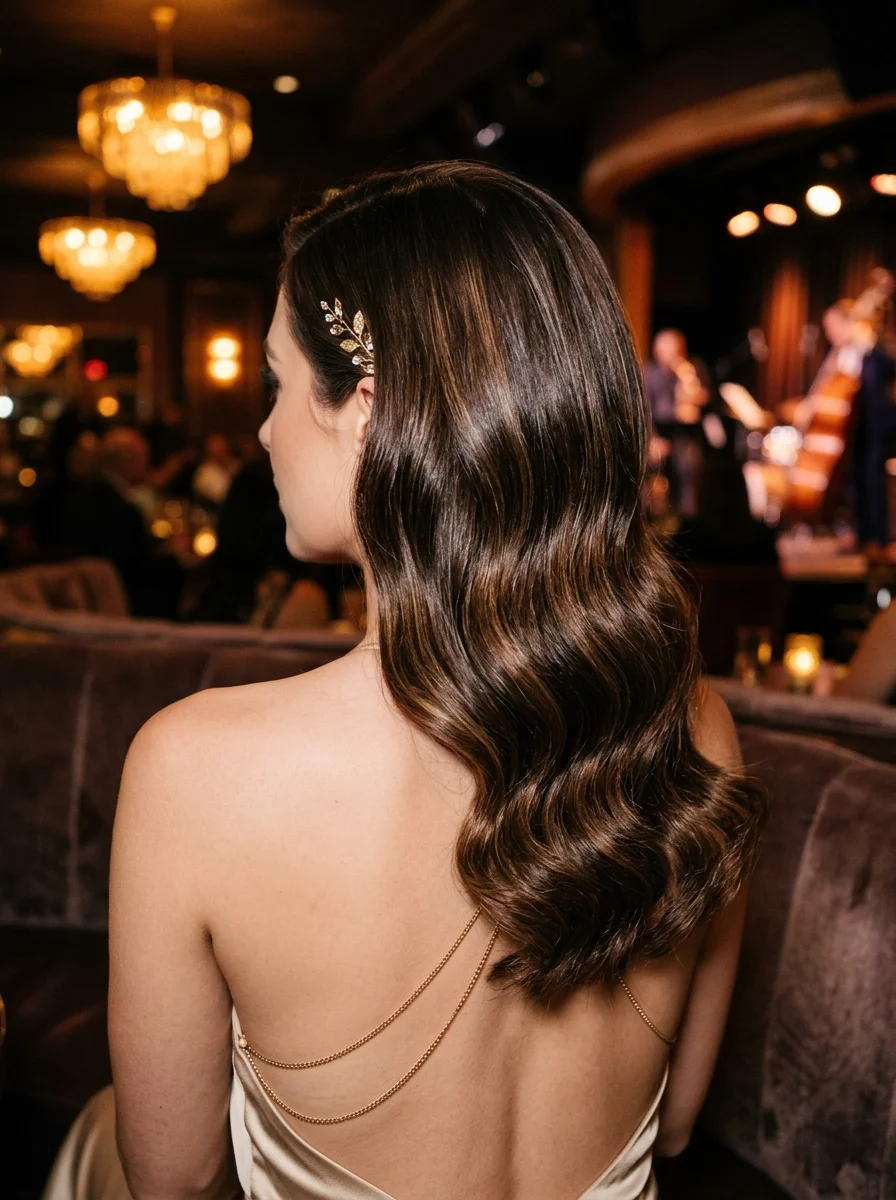
The overview: Short to long-length hair styled into Old Hollywood S-waves with a gold leaf clip at the temple. This is the jazz lounge look — it's glamorous, vintage-inspired, and radiates old-money sophistication. The S-wave pattern is structured and deliberate, catching light in a way that loose waves simply can't.
Why this look is popular: Old Hollywood waves are timeless — they've been red-carpet staples for decades for a reason. The deep espresso color is rich and luxurious. The gold leaf clip adds a vintage accent that feels intentional rather than trendy. The structured wave pattern holds its shape for hours.
Where this look is suitable: Jazz lounges, vintage-themed concerts, cocktail events, and any venue where the aesthetic leans classic and refined.
Step by step:
- Curl in the same direction. Use a 1.25-inch curling iron, wrapping all sections in the same direction (away from the face).
- Pin each curl to cool. Pin each curl in its coiled shape and let them cool completely — at least 15 minutes.
- Brush into S-waves. Use a soft bristle brush to blend the curls into unified S-shaped waves. Brush in one direction only.
- Create the ridge. Use your fingers to pinch and sculpt the wave ridges into definition.
- Sweep to one side. Direct all hair over one shoulder and secure the gold leaf clip at the temple on the exposed side.
Tips and tricks: Pinning the curls to cool is the most important step — it sets the wave pattern. A setting lotion or mousse before curling helps the waves hold their shape. The gold leaf clip should be positioned where it catches light from the venue's overhead lighting.
38 Trending Bandana Hairstyles for Women (2026)
14.Hollywood Glam Waves with a Sparkle Clip
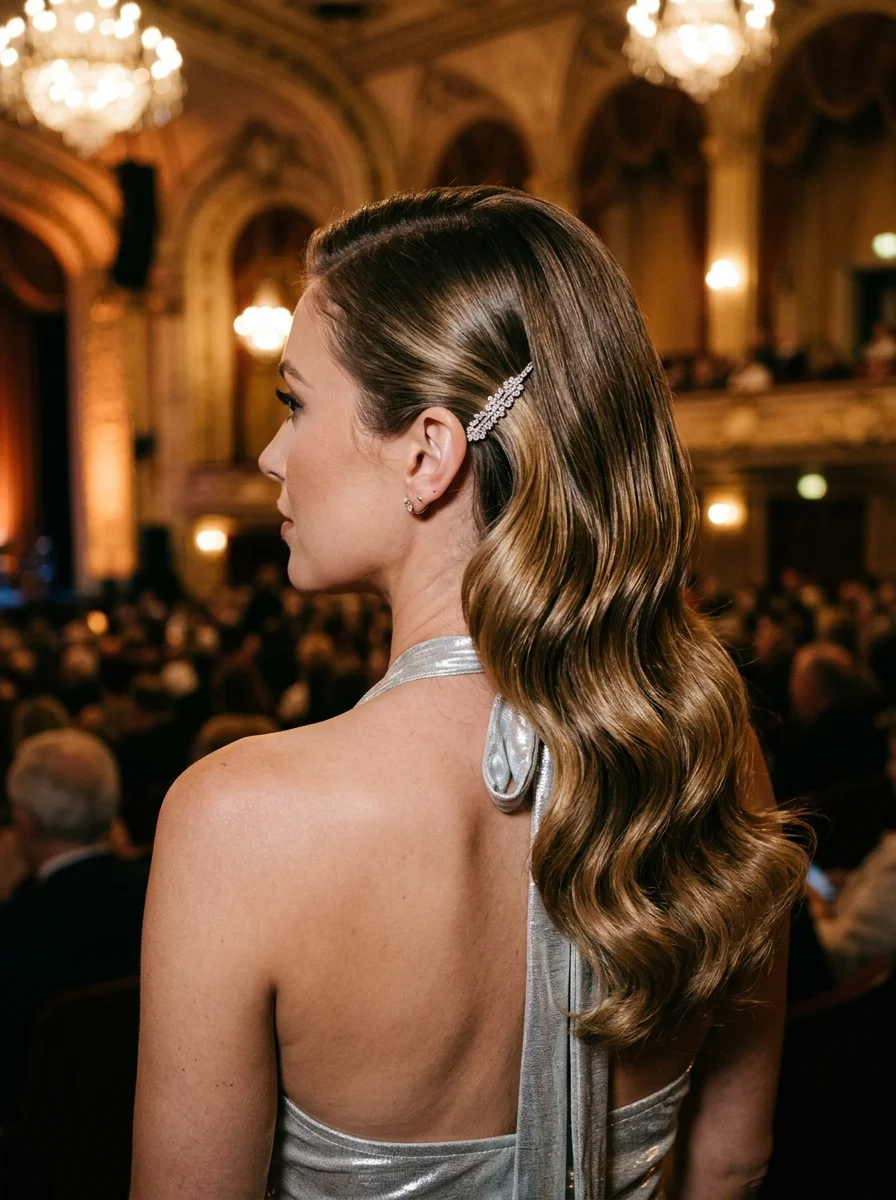
The overview: Short to long-length hair styled into structured Hollywood waves with a crystal barrette. This is the opera and formal event look — it's red-carpet glamour with a modern edge. The crystal barrette catches every light source in the room, and the structured wave pattern looks like it took hours (it didn't).
Why this look is popular: Hollywood waves are the most photographed hairstyle in formal settings for good reason — they're universally flattering and radiate luxury. The honey blonde color is warm and radiant. The crystal barrette adds sparkle without requiring a full head of accessories.
Where this look is suitable: Opera, formal concerts, gala events, and any venue where the dress code is elevated and the lighting is dramatic.
Step by step:
- Apply setting product. Work mousse or setting lotion through damp hair for hold and shine.
- Curl uniformly. Use a 1.25-inch iron, wrapping all sections in the same direction. Pin each to cool.
- Brush into waves. Once cool, brush the curls into unified Hollywood waves with a soft bristle brush.
- Sculpt the ridges. Use your fingers to define the wave ridges and create clean, structured lines.
- Add the crystal barrette. Pin one side back at the temple with the crystal barrette. Ensure it catches light.
Tips and tricks: A heat protectant is non-negotiable before this level of heat styling. For hair that doesn't hold curl well, spritz each section with light-hold hairspray before wrapping it around the barrel. The crystal barrette should be positioned where the venue's lighting will hit it directly.
15.Edgy Braided Updo with Spiked Clip
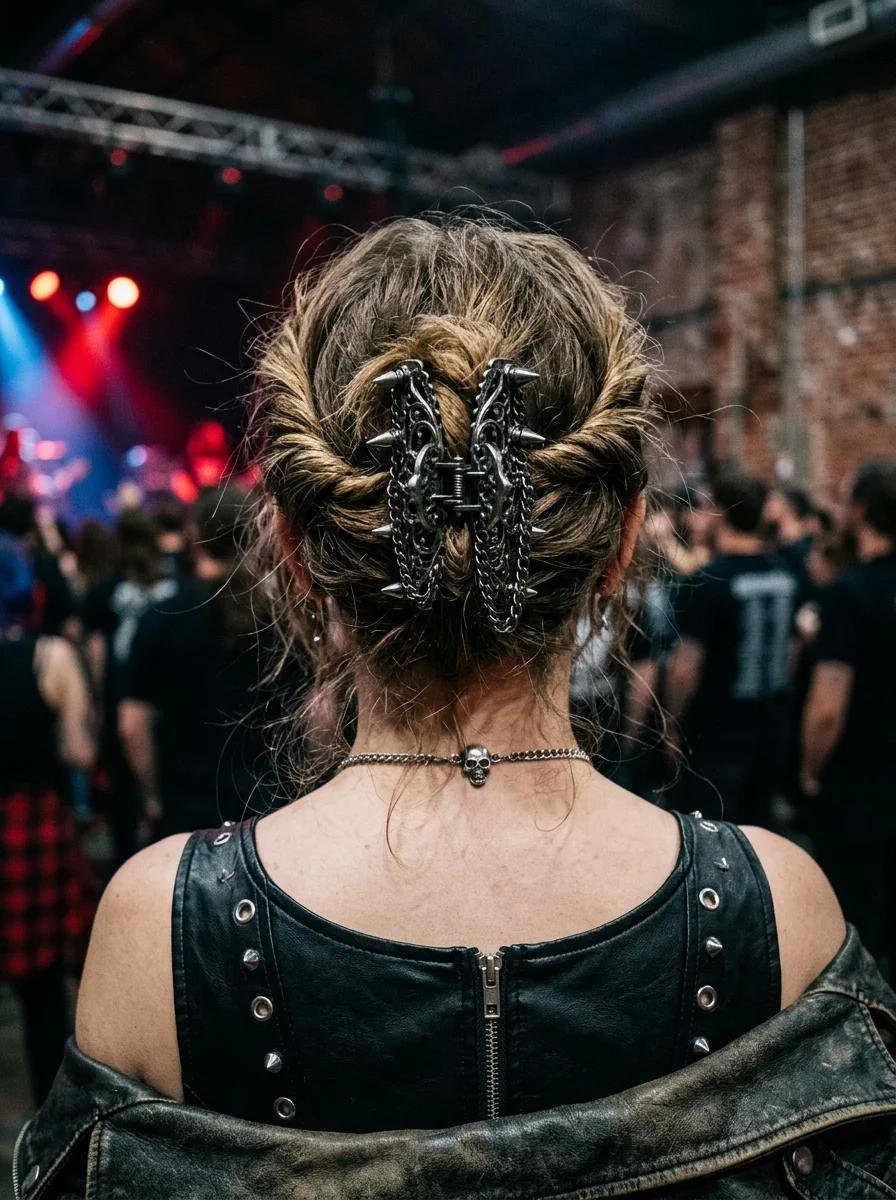
The overview: Medium-length hair deconstructed into Dutch braids and secured with a spiked gunmetal clip. This is the punk and underground look — it's raw, architectural, and deliberately imperfect. The spiked clip adds an aggressive edge that matches the energy of underground venues, and the deconstructed braids look better as they loosen throughout the night.
Why this look is popular: The spiked gunmetal clip is a statement accessory that communicates attitude. Deconstructed braids have an effortless quality that polished styles can't match. The updo keeps hair off your neck in hot, crowded venues while the braided texture adds visual interest.
Where this look is suitable: Punk shows, underground venues, alternative concerts, and any setting where the aesthetic leans raw and rebellious.
Step by step:
- Texturize heavily. Apply dry shampoo or texturizing powder for maximum grip and grit.
- Create deconstructed braids. Dutch braid two or three sections loosely — keep them intentionally imperfect with pieces pulling out.
- Gather into an updo. Twist and pin the braids at the back of the head. Don't aim for perfection.
- Add the spiked clip. Secure the spiked gunmetal clip at one side, gripping through the braids.
- Pull out pieces. Tug strands loose around your face, ears, and nape for a deconstructed frame.
Tips and tricks: The deconstructed quality is the design — don't try to make it neat. The more imperfect, the more authentic it reads. A strong- hold hairspray keeps the braids from completely falling apart while allowing natural movement. The spiked clip should feel secure — if it slides, anchor it with a bobby pin behind it.
27 Coral Nail Art Designs for a Warm, Tropical Manicure (2026)
16.Boho Pearl Chain Draped Waves
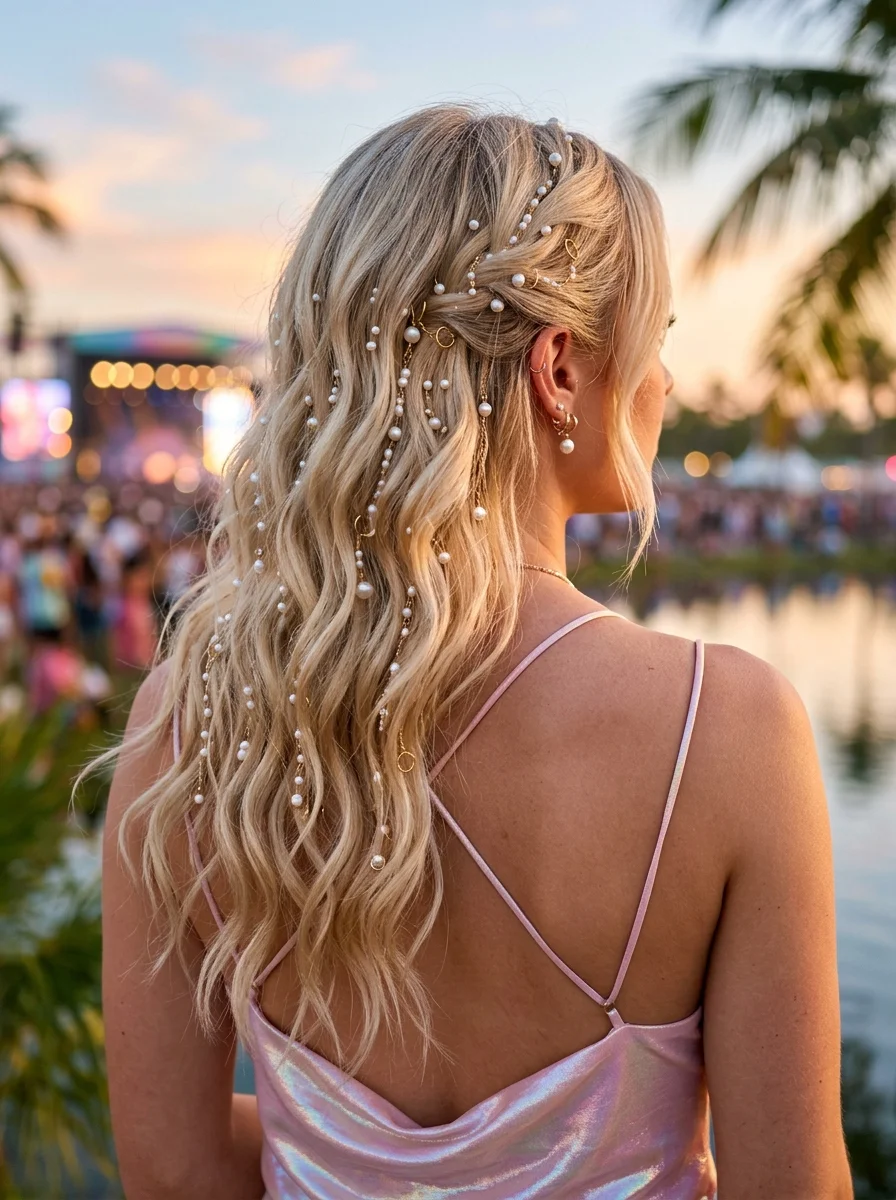
The overview: Medium to long-length hair in a half-up style with waves, draped with a pearl-and-gold chain accessory. This is the sunset festival look — it's romantic, bohemian, and catches the warm evening light beautifully. The pearl-and-gold chain draping creates a jewelry-like effect that transforms loose waves into something editorial.
Why this look is popular: Pearls and gold are having a major moment in hair accessories. The draped chain creates movement and sparkle that photographs beautifully, especially during golden hour. The half-up construction keeps hair off the face while the flowing waves maintain length and softness.
Where this look is suitable: Sunset festivals, outdoor evening concerts, bohemian-themed events, and any setting where the aesthetic leans romantic and ethereal.
Step by step:
- Create loose waves. Use a 1.5-inch curling iron on large sections, leaving ends out. Brush through for soft, flowing waves.
- Gather the half-up section. Take hair from the temples and secure at the back of the crown.
- Drape the chain. Position the pearl-and-gold chain across the crown, letting it cascade down the sides and weave through the waves.
- Adjust the draping. Arrange the chain so it catches light from multiple angles. Secure any loose ends with hidden pins.
Tips and tricks: The chain should drape naturally — forcing it into position makes it look stiff. Secure it at a few anchor points with hidden bobby pins to prevent shifting. The platinum and ash tones are essential for the ethereal quality — warm brass tones clash with the pearl-and-gold aesthetic.
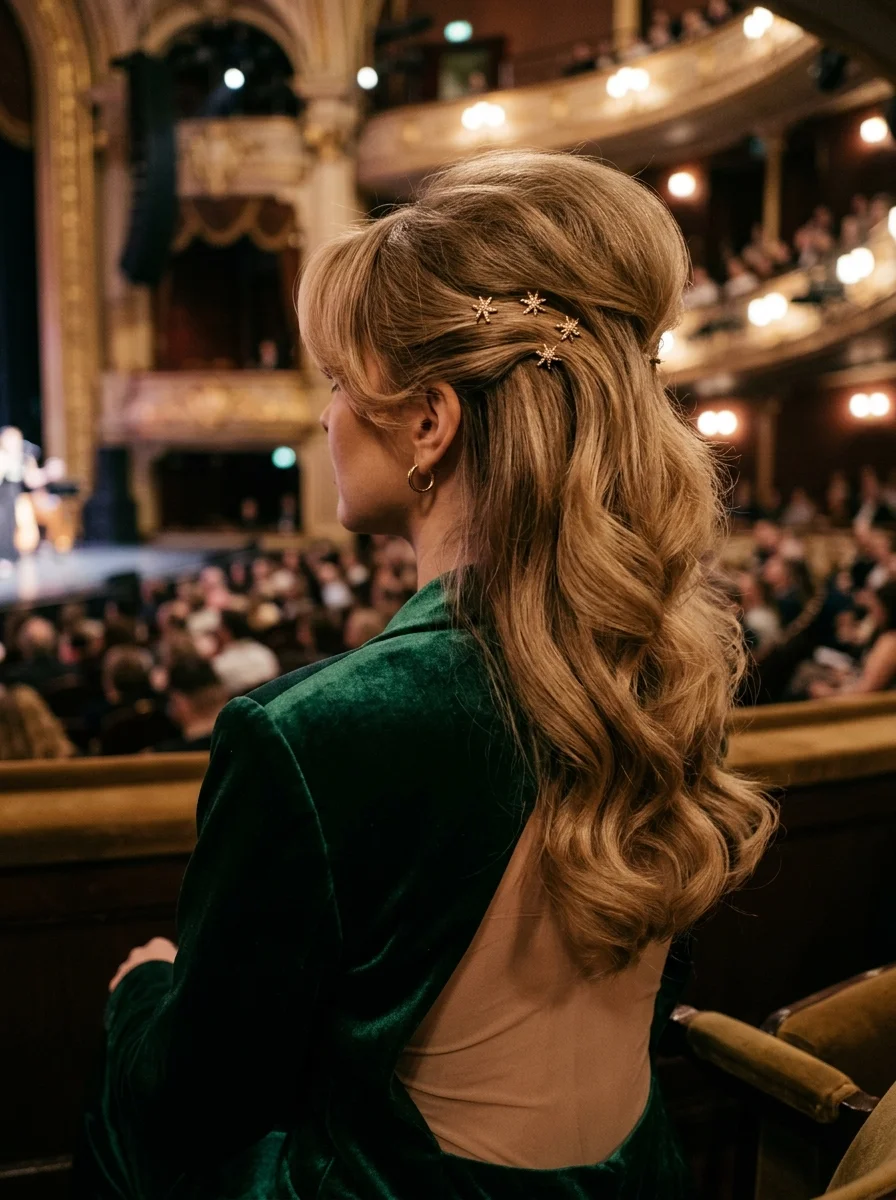
17.Voluminous Waves with Starry Accents
The overview: Medium to long-length hair styled into 70s-inspired volume waves with star crystal pins scattered throughout. This is the theater and opulent venue look — it's dramatic, voluminous, and designed to be seen from every angle. The star crystal pins catch light like actual stars, creating a celestial effect that matches the grandeur of the setting.
Why this look is popular: The 70s volume wave is having a major revival — it's big, bold, and unapologetically glamorous. The strawberry blonde color is warm and eye-catching. The star crystal pins add a whimsical, celestial touch that transforms volume waves into something magical.
Where this look is suitable: Theater performances, opulent venue concerts, formal events, and any setting where the aesthetic leans dramatic and glamorous.
Step by step:
- Volumize at the roots. Apply volumizing mousse to damp hair and blow-dry with a round brush, lifting at the roots.
- Curl for bounce. Use a 1.5-inch curling iron on large sections, wrapping away from the face. Pin each to cool.
- Brush into waves. Once cool, brush through with a paddle brush to blend the curls into voluminous, flowing waves.
- Add star pins. Scatter star crystal pins throughout the waves at random intervals. Vary the placement for a celestial effect.
- Tease for height. Backcomb the crown slightly for extra volume and lift.
Tips and tricks: Velcro rollers set at the crown while you do your makeup create lasting volume with minimal effort. The star pins should be lightweight — heavy pins pull the waves down. For fine hair, a root-lifting spray before blow-drying makes the volume last all night.
22 Best Graduation Day Hairstyles for 2026 🎓✨
18.Voluminous Defined Spiral Curls
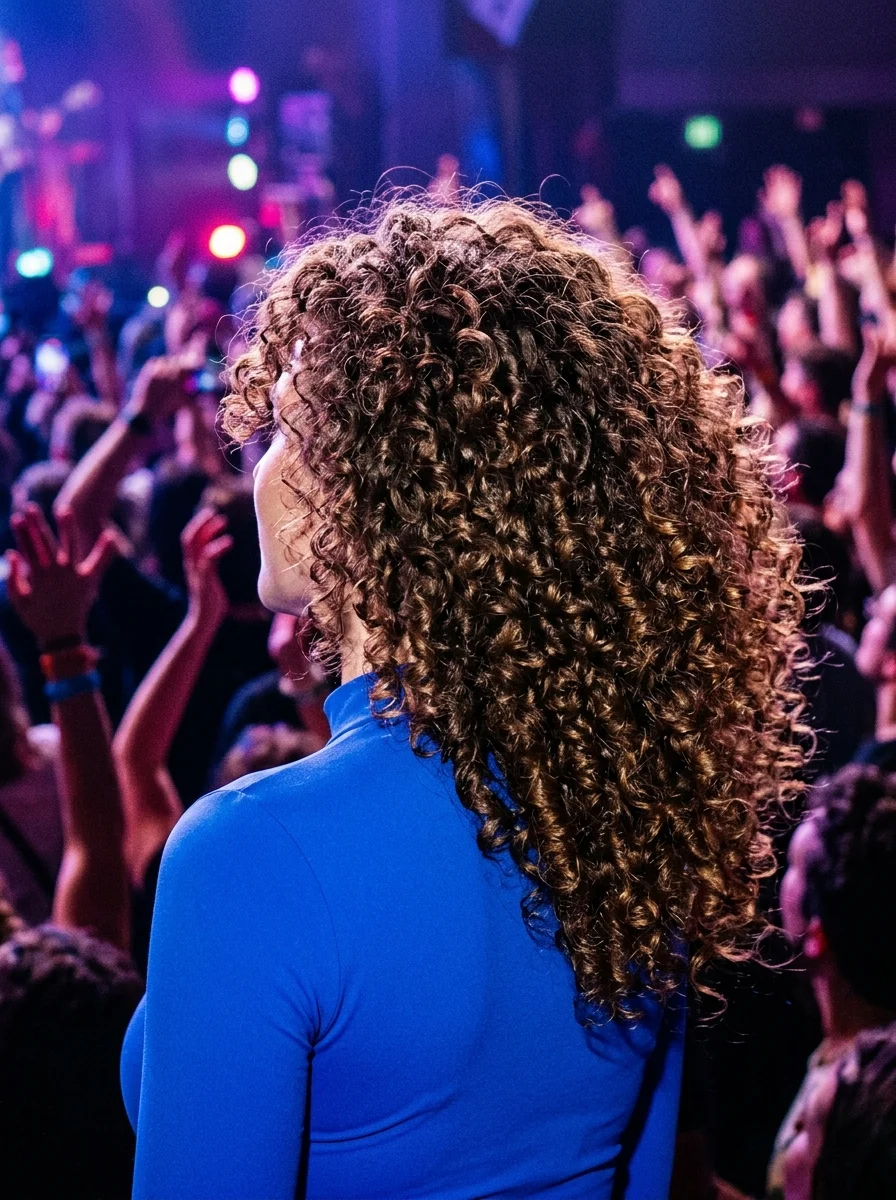
The overview: Medium to long-length hair with 3A-3B natural curls worn fully down and defined. This is the pop and R&B club look — it's voluminous, bouncy, and celebrates natural texture at maximum capacity. The golden highlights catch every light source in the venue, and the defined spiral curls create a silhouette that's impossible to ignore.
Why this look is popular: Defined natural curls have a bounce and movement that heat- styled curls can't replicate. The golden highlights add dimension and catch light beautifully in dark venues. Wearing curls fully down maximizes volume and creates a head-turning silhouette.
Where this look is suitable: Pop concerts, R&B club nights, and any venue where big hair energy is the goal.
Step by step:
- Wash and condition. Use sulfate-free shampoo and a deep moisturizing conditioner. Detangle with a wide-tooth comb.
- Apply curl cream generously. On soaking wet hair, work curl-defining cream through every section using the praying hands method.
- Scrunch and shape. Flip your head upside down and scrunch upward. Shake the roots for volume.
- Diffuse on low. Use a diffuser on low heat and low speed. Hold the diffuser against sections without moving it around.
- Break the cast. Once completely dry, scrunch out the product cast with lightweight oil on your palms.
Tips and tricks: Don't touch the curls while they dry — touching creates frizz. A microfiber towel absorbs water without roughing up the cuticle. For maximum volume, flip your head upside down and shake the roots once the curls are fully dry. A refresh spray in a travel bottle revives curls that flatten during the night.
19.Retro Volume Waves with a Daisy Clip
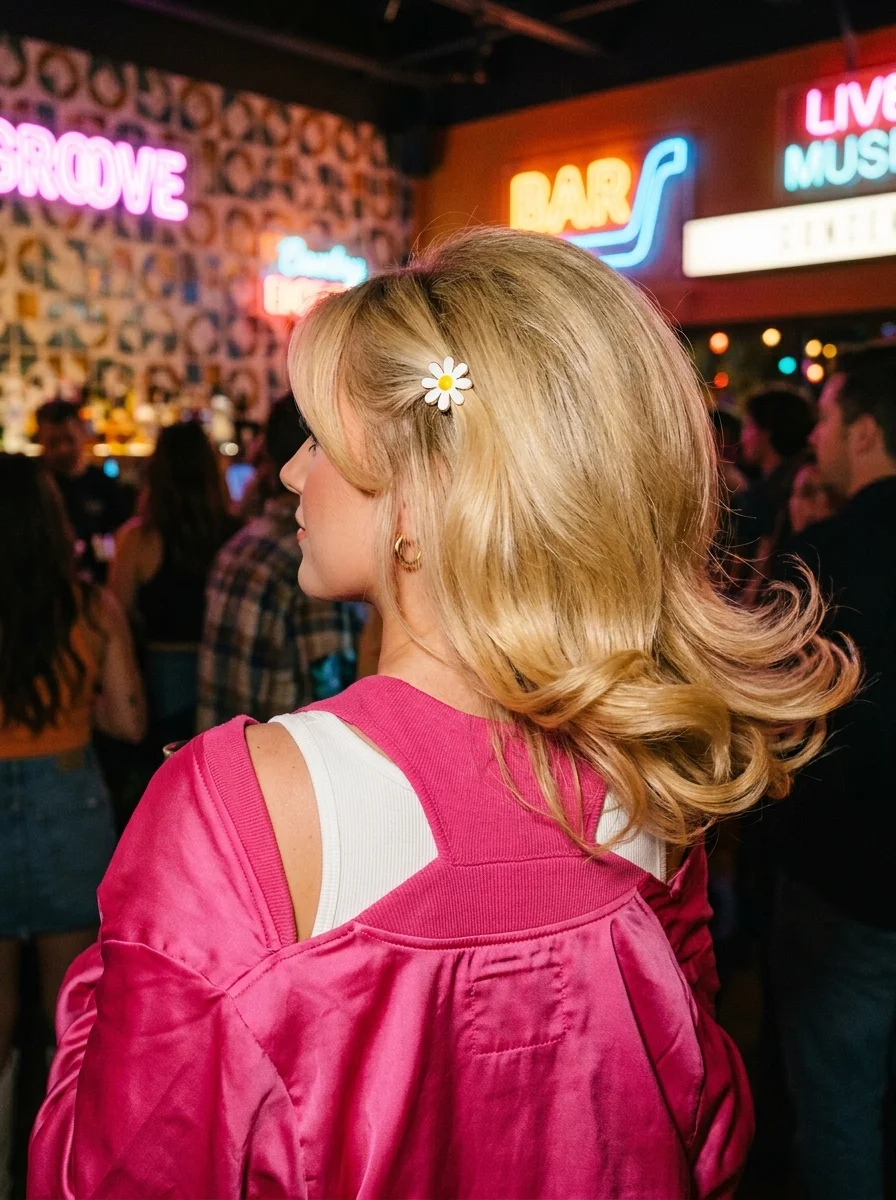
The overview: Short-length hair with 60s-inspired blowout volume, curtain bangs, and a daisy clip. This is the bar and club with live music look — it's retro, playful, and has a feel-good energy that matches the atmosphere. The daisy clip is a nostalgic detail that adds sweetness without looking juvenile.
Why this look is popular: The 60s blowout revival is one of the biggest hair trends — it's voluminous, feminine, and photographs with retro charm. Curtain bangs are the most wearable bang option for most face shapes. The daisy clip adds a whimsical, nostalgic touch that pairs naturally with the retro silhouette.
Where this look is suitable: Bar shows with live music, retro-themed events, casual club nights, and any setting where the vibe is fun and nostalgic.
Step by step:
- Volumize heavily. Apply volumizing mousse to damp hair and blow-dry with a large round brush, lifting at the roots.
- Set with velcro rollers. Roll large sections at the crown into velcro rollers and let them cool for 15 minutes.
- Curl the ends. Use a large barrel iron to flip the ends outward for that retro effect.
- Remove rollers and brush. Take out the rollers and brush through for unified, bouncy volume.
- Add the daisy clip. Pin the daisy clip at one side near the temple for a playful accent.
Tips and tricks: The velcro rollers are the secret to lasting volume — don't skip them. The daisy clip should be small enough to look like a subtle accent, not a statement piece. For hair that falls flat quickly, a root-lifting spray before blow-drying makes the difference.
28 Cute & Sporty Baseball Game Nail Ideas for 2026 ⚾
20.Sleek High Bun with a Twisted Crown
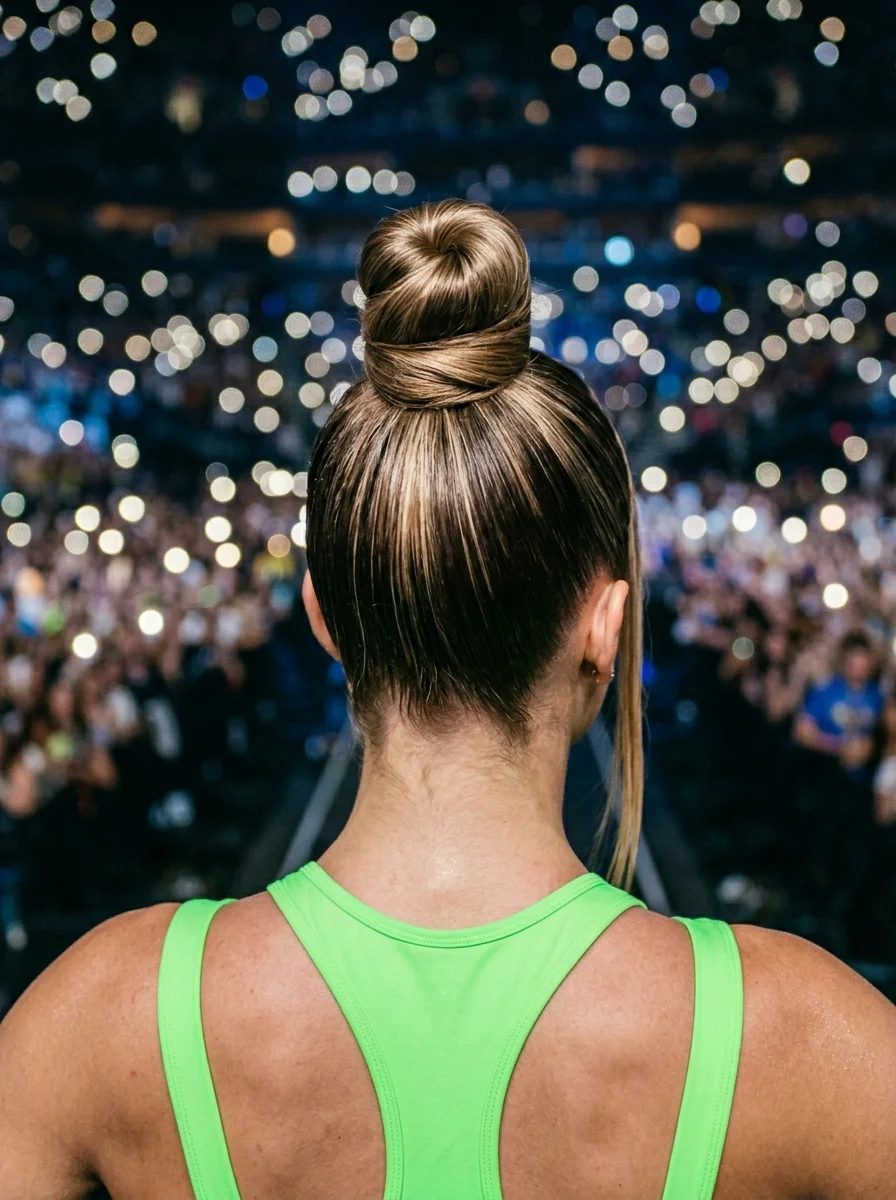
The overview: Medium to long-length hair brushed upward into a high bun positioned at the crown. A twisted section wraps around the base of the bun, creating an architectural crown detail. This is the arena and stadium look — it's polished, commanding, and designed to be seen from every distance. The high bun creates a visual lift on the face, and the twisted crown adds an architectural element that separates it from a basic topknot.
Why this look is popular: The high bun is the ultimate practical concert hairstyle — it keeps all hair off your neck and face for hours. The twisted crown detail adds sophistication that elevates it beyond gym hair. The caramel highlights add dimension to the sleek silhouette, catching arena lighting beautifully.
Where this look is suitable: Arena concerts, stadium shows, large venue events, and any setting where you need your hair to hold up for hours in a crowd.
Step by step:
- Smooth with product. Apply gel or pomade from roots to ends for maximum sleekness.
- Brush upward. Using a boar bristle brush, pull all hair from the nape and sides toward the crown.
- Secure the ponytail. Gather at the crown and secure tightly with a strong elastic.
- Create the twisted crown. Take a section from the ponytail and wrap it around the base in a twisted pattern. Pin underneath.
- Form the bun. Twist the remaining ponytail and wrap it into a clean, round bun. Pin with color-matched bobby pins.
Tips and tricks: A boar bristle brush is essential for the sleek finish. For thick hair, use a strong-hold edge control gel rather than regular gel — it provides better hold. The twisted crown detail should be tight and precise; loose twists look messy rather than architectural.
21.Classic Double Dutch Braids
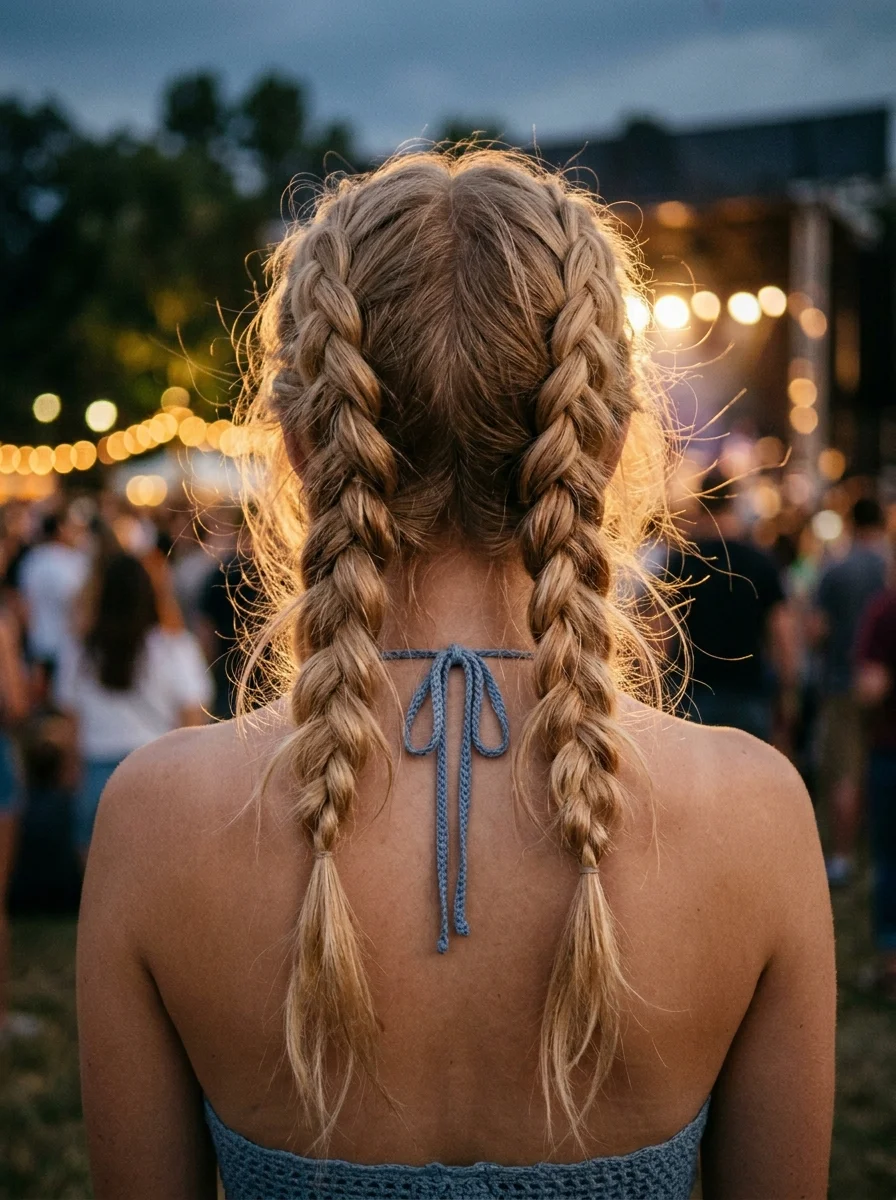
The overview: Medium to long-length hair in two Dutch braids with pancaked volume. This is the outdoor evening festival essential — it's practical, durable, and looks better as the night goes on. The Dutch braid technique creates raised braids that sit on top of the scalp, and the pancaking adds width that makes them look thick and full.
Why this look is popular: Double Dutch braids are the most reliable concert hairstyle — they distribute tension evenly across the scalp, stay secure for hours, and require zero touch-ups. The pancaked width creates a statement silhouette that photographs well from every angle. They work on medium to long hair and take under 15 minutes.
Where this look is suitable: Outdoor evening festivals, all-day concert events, and any setting where durability and style need to coexist.
Step by step:
- Part precisely. Use a rat-tail comb to create a clean center part from forehead to nape.
- Dutch braid each side. Starting at the hairline, cross strands under to create the raised effect. Add small sections from each side as you braid backward.
- Braid to the ends. Continue each braid down the full length of the hair. Maintain consistent tension.
- Secure the ends. Tie off each braid with clear elastics about two inches from the bottom.
- Pancake both braids. Starting from the top, gently pull the outer loops of each braid outward to widen them. Work down the entire length for consistent volume.
Tips and tricks: Keep consistent tension across both braids — if one is looser, the braids will look uneven. Texturizing spray before braiding gives the hair enough grip to hold the pancaked shape. For finer hair, the pancaking is essential for creating the statement width that makes this style festival-worthy.
28 Stunning Softball Hairstyle Ideas with Braids for 2026 🥎✨
The Flash Photography Hack
Everyone wants that perfect concert photo where the stage lights hit their hair just right. But under harsh venue lighting and camera flashes, hair can look flat, dull, or unexpectedly frizzy. The difference between a photo where your hair looks amazing and one where it looks forgotten is usually down to one thing: the finish product.
Light-reflecting serums and glaze sprays with particles like mica or pearl extract catch stage lights and flash photography, making hair look glossy and healthy even in low-light conditions. The key is to apply them sparingly — too much reads as greasy under flash, especially if you are already sweating. One pump of a shine serum spread through the mid-lengths and ends, avoiding the roots entirely, is the sweet spot.
The color-specific tip? If you have dark hair, a clear shine spray is your best friend. If you have blonde or lightened hair, a purple-toned shine spray prevents brassiness under yellow venue lights while adding that extra glow for the gram. A product like Kristin Ess Gloss works well for both.